
Chris Alexander
12th March, 2017
I have been hacking on a VS Code extension and was quite surprised to find no integration out-of-the-box with VSTS, and no real evidence of anyone online who has actually done it and written about it.
So I spent an evening this week going through and figuring out the various steps required and getting it setup for my basic extension. As I have previously discussed, the tooling is a bit of a problem in that it isn’t that obvious how to do the packaging and releasing steps, and could do with some polish. But with some perseverance, it is possible to do it through The Cloud!
Quite a while ago now VSTS shipped the concept of Releases. This is a process in addition to a build where you can take build artifacts and deploy them.
In the old days, you might have had a build which does a deployment at the end, or maybe even with a flag - or a second build which deploys the artifacts from the first build. With VSTS Releases, that feels a bit stone age.
The Release mechanism means that your build is doing what it is meant to and nothing more - compiling together your releaseable artifacts. Once you have these built and tested artifacts, you use the Release mechanism to deploy these exact artifacts to multiple environments. Now you may have just one environment (as we will do here), but you could have a QA environment, Staging for final sign-off, and the actual production environment, as an example.
The tooling means that you can prescribe slightly different release processes per-environment and then very easily take exactly the same artifacts and test them everywhere. That’s a really important capability to help isolate out build problems from your deployments.
So to get this VS Code extension out in the wild, we are going to have a build which produces the installable artifact (which you can then download to test locally if you like) and then a Release step to one environment which deploys it to the Visual Studio Marketplace.
I already have the code in a Github repo so once you have created a VSTS project you can go through to creating a build. It’s just a few clicks to hook up your Github account to VSTS and immediately gives you all the access you need to select which repo etc.
Let’s take a look at what build steps to create:
This is a pretty typical build process so let’s look through the individual components, where the magic happens.
The packaging tool vsce is installed as an NPM package. Good news, this means VSTS has a build step for us.
Create a blank NPM step, then set the properties up like this:
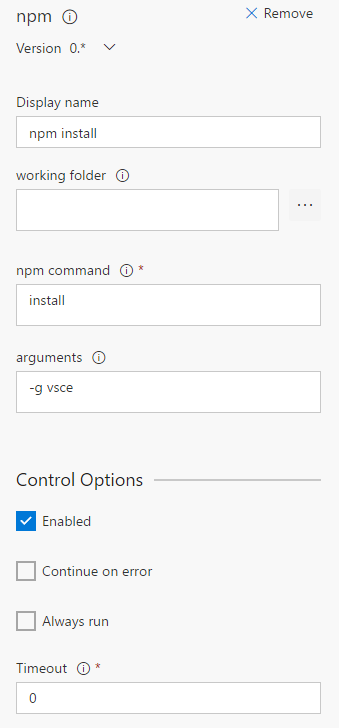
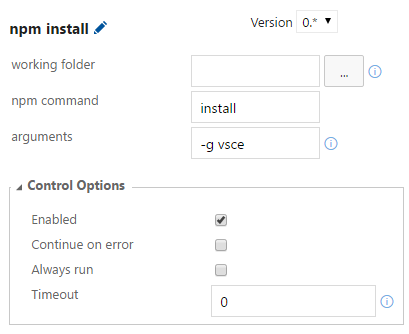
The “command” is install and the arguments are -g vsce so we install that package globally.
As an aside, I think the VSTS build environment isoloates that out on the actual machine, so that other people aren’t affected by our global package installs.
VSCE has a command argument which allows you to just create the package - normally from the command line you would skip this step and package and publish in one go, but because we are separating out the build and publish steps here, we only want the first bit to produce the artifact.
To do this, we create a new Command Line build step (here is where we could do with better VSTS integration):
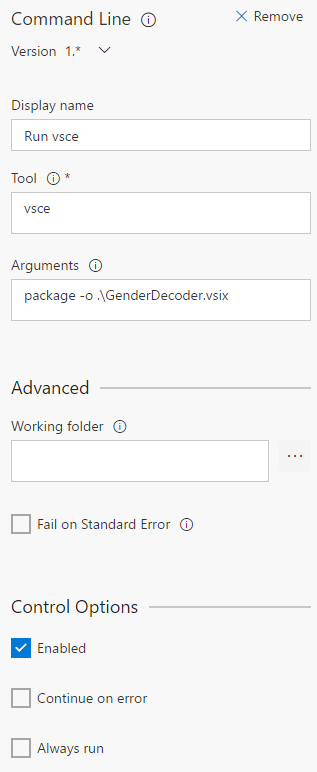
The “tool” is vsce and the arguments are package -o .\GenderDecoder.vsix. The GenderDecoder.vsix is a hard-coded name that all of the bits of the process know, but you can set it to whatever you like for your extension (just adjust the other steps too).
Now we have produced the VSIX, the last two steps produce the build artifact so that we can access it later on and use it in our Release process.
Because you are building in the cloud, copying your output files to artifacts is a really important step because once you are finished with the build agent, everything will be deleted from it and you won’t be able to get your hard-built code!
The copy step looks like this:
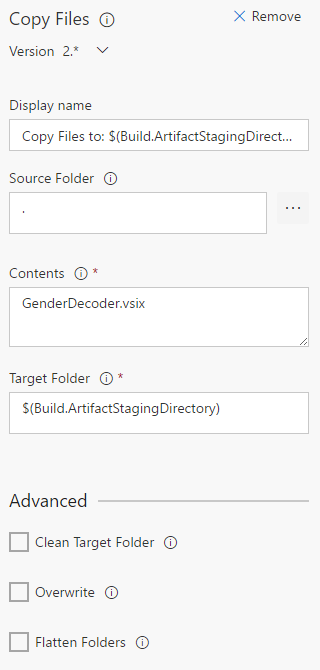
The important parts that need configuring in here are “Source Folder”, which is just . because we want to copy from the root of our build; the “Contents” which is GenderDecoder.vsix, which is the one file we want to copy; and finally the “Target Folder” is $(Build.ArtifactStagingDirectory). The artifact staging directory is where we put all the files we want to turn up in our various output artifacts and provided for us by VSTS. Note that we copy only the one file we want to keep, it is best practice to do this and minimise the amount of output put in the artifacts to minimise transfer and download times.
Finally our publish artifact step is basically the default:
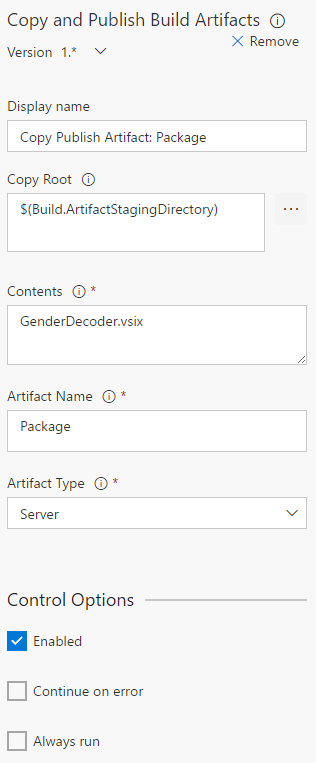
Here we publish from the “Copy Root” of $(Build.ArtifactStagingDirectory); the file is again explicitly listed but you could use * if you like; and the artifact name is Package, which is important for later on as it is how we will reference the artifact in the UI and in our Release.
That’s it for the build steps themselves. I have also set it up to run CI, so that every time I check in to Github, the VSTS build kicks off.
There are a number of improvements that could be made, which we will hold off on for today:
OK, we’ve got our built artifacts (make sure you run a build once you have created it to make sure it works). Now it’s time to put them in the Visual Studio Marketplace!
The release itself is actually just two steps but getting them right, again without decent VSTS integration, is a bit of a faff.
When you create a release, you also need to create one or more “environments” for your code to be deployed to. I have created just one environment, “Marketplace”, but as discussed earlier you can do all kinds of complex environments if you want, including various sign-off and acceptance tests at each stage. It’s a neat way of formalising what I have always experienced as pretty informal and potentially erroneous processes.
Inside your Marketplace environment, we are going to need two release steps:
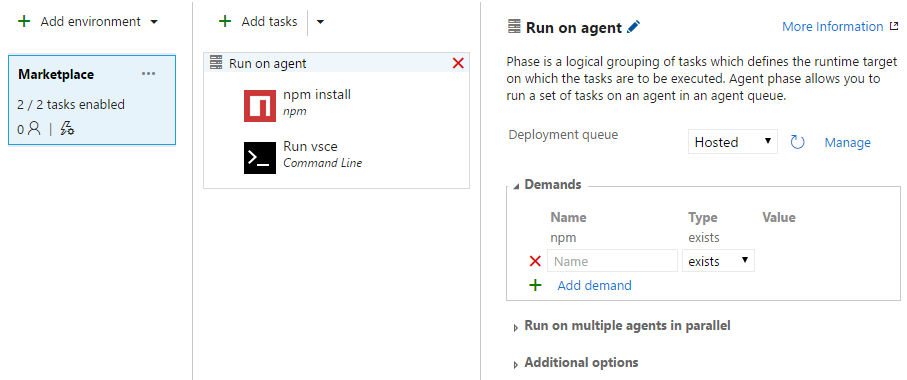
This is an NPM install (again) and a command line execution.
The NPM install is a copy-paste basically from the Build process - we again need access to VSCE (remember this may be on a completely different machine to your original build) so we need to get it installed:
VSCE has a mode where you can specify a VSIX path to publish to the store, which is what we want to do here. However, to publish to the store, you need an API key. Follow these instructions to get that then pop back here.
In order to allow you build access to this API key, I have put it in a “variable”. Pop over to the Variables tab in the Release definition, and create one called authcode. Paste in your API key, and then click the padlock next to the input. It should look like this:
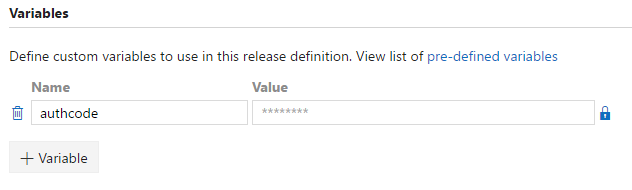
The reason you click the padlock is that it indicates to VSTS that this is an API key or some other secret, so the value is stored encrypted and scrubbed from all of the output logs you can see. Handy!
Now we have the API key, it’s time to do the release. VSTS kindly includes all the output artifacts from the build in your release environment for you, so it’s just a case of hooking it all together now as by the time you come to do your release, VSTS will have made sure the VSIX file has been downloaded to the machine for you.
So I have another command line step, like in the build, instead it is configured this way:
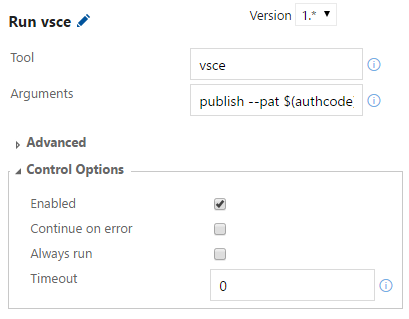
In this case, the “Tool” is again vsce, and the “Arguments” are a little more complex. They look like this:
publish --pat $(authcode) --packagePath $(System.DefaultWorkingDirectory)\Master\Package\GenderDecoder.vsix
They break down into:
publish: Tell VSCE we are going to publish a VSIXpat: Provide the API key to VSCE to do the publish - note this uses the variable we created earlierpackagePath: The path to the VSIX file - this is a bit complexThe path breaks down into a number of components; first we specify that we start at the working diretory of the release. Then we go to “Master”, which is the name of the original build process, then the “Package” is the artifact name; finally we have the name of the VSIX itself.
This took some working out on my part, but if you stick to the conventions described in this post, yours will be more or less the same (at least have the same parts if not different names).
And that’s it! Once you have set up these steps you can kick off a release to that environment. Then you end up with your extension in the Marketplace, but built and deployed using nice easy buttons in VSTS!